Tuesday, June 30, 2015

Palette: A Mini Quilt

There are people who step in and stay in our lives for a short while, and they linger in our minds. Mary Ann is one of these people to me (although I certainly hope she stays in my life for a long time). During my time working in our school district with her (4 years), I didn't see her every day, but every single one of our interactions was a positive one. She teaches art with feeling, and you can see and feel the students' enthusiasm for art class. Personally, she's encouraged me to try new things with my art and my career. She doodles in team meetings (one time I pulled out my notebook to show her all of my free motion quilting doodles!). We are two people who connect because of our dedication to children and art.


Mary Ann retired two weeks ago, and I made her a small mini quilt to remember her time teaching art to our students. I had the urge to create something rainbow-y but I resisted; instead, I reached for my cool scraps and pieced together an improv background. It seemed more calming. Then, I quilted words about teaching and art with my FMQ foot, adorned with various designs. I thought, as a fellow doodler, she might appreciate this (she did). I really enjoy writing words on my quilts. I'd like to quilt a larger quilt with just words one day.


I wanted to make something larger/more profound, but I wanted her to be able to take a small piece of art someone made for her wherever she goes. That's why, hopefully, an itty mini quilt fits the bill. I wish her joy wherever she goes next.


P.S. Speaking of art, Esch House Quilts posted an interesting blog post about quilters and art. I tend to call my work "art;" to me, an artist creates, and that's exactly what I do. What do you think? Do you prefer the term quilter, artist, designer, or no label at all?


Saturday, June 27, 2015

Sunrise: AMH Mini Quilt Swap

The last mini quilt swap I signed up for on Instagram this year was the #annamariahornerminiquiltswap (which probably wins the award for longest swap hashtag). This is my favorite mini out of the three (see Teal Peek and Rainbow of Pearls). It was made using the process from Scatter, Breeze, Soar, and my Orange Peel and Improv classes (my July classes have only two spots left - register soon!)


Those who know me well are already aware that I keep my AMH stash separate from all my other fabric; this was definitely the right swap for me. Taking Anna Maria's class at QuiltCon in February was infinitely inspiring. Without sounding like a total goofball, I'll just say that it was truly a privilege to be there and learn from her (AND Denyse Schmidt, who was taking the class).


My partner (@c_wraestitch) mentioned that she loves warm colors (which is funny because I'm definitely a cool color girl!). Her mosaic showcased orange peels, and I was itching to make some smaller ones. Boom! My decision was made. She says she loves the mini!!


For the first time, I quilted my orange peels with my free motion foot in a veiny-leaf pattern. I feel like this extra detail really puts more "oomph" into the mini. Also, I used light gray (Aurifil 2600) on the bottom of the quilt, medium gray in the middle, and dark gray on top. You can see the thread color changes in the picture below.


The back of this mini is made up of scraps from my dealings with Anna Maria Horner Feathers (they leave a ton of awesome scraps). I love how you can see the quilted peels!


I hope this mini treats Claudia well. I know I'll miss it.

Thanks for reading all my mini quilt posts recently! I have a couple more finished projects to share soon and some progress on my two current large quilt projects. Also, the Dream Team (aka the husband, the sister, and me) are working on a project for this blog. And no, we aren't sewing together. :P Stay tuned!


Thursday, June 25, 2015

Rainbow of Pearls: A Mini Quilt

The Lizzy House Mini Quilt Swap (#lizzyhouseminiquiltswap) on Instagram also drew me in this year (see my Cotton and Steel mini quilt). I've always admired Lizzy and I adore her fabrics (I'm Team Pearl Bracelets forever!). She's also visiting the CJMQG this August, which makes me want to sprout wings and fly over a rainbow. But really, I'm excited to meet her, hear her story, and learn from her.


My partner indicated that she loves Pearl Bracelets and rainbows - since I love those things too, it was easy to come up with a fun, unique design. I made the top at Mid-Atlantic Mod retreat and used it as an example in my Orange Peels and Improv classes that weekend. It was so relaxing to make orange peels that day, surrounded by so many of my friends who were also sewing!


It took a lot of willpower *not* to quilt this one to death. For the sake of design, I wanted the quilting to really pop and allow the prints to dominate. I've been really into pebbling lately, and as I pondered that fact, a crazy (but awesome) idea jumped into my head: outline the petals with pebbles. I usually go with my crazy awesome ideas, and I'm almost always pleased. I quilted with my signature light gray Aurifil 2600 (Dove), which makes the quilting show a little bit more than a white thread would have.


And below, hubby wanted to participate, too :D


Bound and backed in more Pearl Bracelets (did you notice that the white background is Pearl Bracelets, too?), I think it's safe to say that this mini quilt has been completely conquered by the PBs.

I also included these cute double-sided coasters as an extra because I love making scrappy things, and double-sided is always better than one sided. Especially when it comes to Oreos (like, just one cookie would be a bummer, right?).


My partner @melissa_mrf1290 received her package yesterday and she loves it - I'm relieved and thrilled!

I'm just waiting for my 3 mini quilts to arrive (!) and then I'm done with Instagram swaps for a while. As much fun as it was, I have other quilts to focus on (and I'd rather do a personal swap with someone I know). :)


Wednesday, June 24, 2015

WIP Wednesday: Herringbone Edition


It's time that I start a huge project: my best friend Julie's wedding quilt. She and Brian are getting married in October (and I'm a bridesmaid, sooo excited!) and I told them that, if they wished, I would love to make them a quilt for their bed as their gift. In the interest of making something that fits their home, I asked if they could plan it out with me. We decided one side is going to be black and white (and cream) herringbones with dashes of royal blue (for Brian). Each of these strips are 2.5 inches wide x 22" long,  and this thing is going to be between queen and king size... so you can imagine how long they actually are! The picture doesn't do it justice - there are about 40 strips sewn to each panel so far.

I'm using Maureen's quilt-as-you-go tutorial for a herringbone quilt; I'm sewing straight onto the batting (10" wide). Then, I just trim the whole thing down. I marked the first couple of strips and then just went for it. That may mean that the angle isn't perfectly 45 degrees all the way, but what's more fun: sewing, or marking hundreds of lines? I try to keep my priorities straight! I'm also going to quilt each panel before I sew it into a top. That's the beauty of "quilt-as-you-go," right? :)


Some of the fabrics are special: the third from the right ("Script in Noir" from Minimalista by Art Gallery) is doctor-like writing (Julie is a nurse), the circular one ("French Big Dot in Black" by Suzuko Koseki) has French words all over it (Julie loves Paris), and she loves Sudoku, too (far left). I bought all three of those fabrics, plus more, from the lovely Becca of Sew Me a Song, my sponsor! She always has what I'm looking for when it comes to unique prints.

The other side will be a fall theme, covered in red, orange, and yellow squares with notes from their wedding guests. I'll also add in some Modern Maple blocks. I can't wait to put the whole thing together and make an heirloom for their new family!


 Meanwhile, we took advantage today of the momentarily beautiful weather and drove up to Delaware Water Gap, PA for some biking. We had a blast. If you've never been to the Poconos, it's absolutely a place you must visit. I'm always astounded by the beauty. We saw a couple of small waterfalls and a frog! The trip ended with lots of mud everywhere but it was worth it! :) Hopefully we'll be able to invest in our own bikes soon.

Hope you are sewing this week, too!


Monday, June 22, 2015

Flutter Quilt: Busy Girl Sews Blog Tour

Fun fact: Heidi Staples of Fabric Mutt was my first swap partner ever, way back in 2012! I received a GORGEOUS mini quilt, Perspective, that has hung in my sewing space ever since (in fact, I'm looking at it right now!). I also use the fabric basket she made me daily. Since then, Heidi has become a great bloggy/sewing friend of mine, and I'm so excited that she has written a book, Sew Organized for the Busy Girl: Tips to Make the Most of Your Time & Space (23 Quick and Clever Sewing Projects You'll Love). 


 Goodness knows I'm a busy girl, and I try to make time to sew every single day. And boy, do I like beautiful but simple quilts. That's why I jumped to make the Flutter quilt from Heidi's book: it's perfect for a little girl or boy, and it was an absolutely pleasure to make. I found this summery Design Seeds color scheme on my Pinterest Color inspiration board and pulled lights and darks from my fabric stash:


Fun!


(I left out the peach)

I took inspiration from Heidi's original version (below) and made my background scrappy low volume. It's hard for me to do anything but that these days anyway. ;) Love it!


Quilting this was exhilarating. I decided to make pebbles my central theme because I knew they would make a bold statement. Small pebbles, large pebbles... they're all fabulous in my book. Plus, they don't have to be perfect. They have character.


For binding, I decided to split between two of the heart prints from Anna Maria Horner's Pretty Potent collection. I bought yardage of these specifically for binding, and I just LOVE how they mesh together. I almost went with just the warmer color but I'm very happy with my decision.


I backed this quilt in some leftover Anna Maria Horner flannel that I had from Breeze. It's perfect for a baby's crib!


One last awesome shot as the sun disappeared and then came out again. Texture!:


Besides this quilt and the gorgeous, modern traditional style projects Heidi highlights in her book, she has also scattered organizational tips throughout (from other sewists, too). I personally like to keep my projects separated in plastic boxes (purchased from Michael's), and I love Heidi's free download Project Bag Form!

Thanks for joining me on the Busy Girl Sews Blog Hop today! Make sure to visit the other stops and to check out Heidi's book for a slew of pretty, quick, and satisfying sewing projects.


March 30 - Lynne of Lily's Quilts 
April 6 - Jodi of Tales of Cloth & Angela of Cut to Pieces
April 13 - Lindsay of Craft Buds & Debbie of A Quilter's Table
April 20 - Leanne of She Can Quilt
April 27 - Fat Quarter Shop
May 4 - Erin of Why Not Sew?
May 11 - Jennifer of Ellison Lane Quilts
May 18 - Svetlana of SOTAK Handmade
May 25 - Lucy of Charm About You
June 1 - Maureen of Maureen Cracknell Handmade
June 8 - Becca of Bryan House Quilts
June 15 - Beth of Plum & June
June 22 - Jessica of Quilty Habit <<<<<<<------ You are here!
June 29 - Caroline of Sew Can She
July 6 - Heidi of Fabric Mutt (Tour Wrap!)


Stay tuned this week for lots of sewing! It's stay-at-home vacation week here!
Linking up to Sew Cute Tuesday, Fabric Tuesday
 Needle and Thread Thursday,
TGIFF 
Crazy Mom Quilts 

Sunday, June 21, 2015

Giveaway: Misdirection Pattern

 *This giveaway is closed. Congrats to Jackie! She has been emailed.*

Thank you for all the love for my latest quilt, Sunset. It really was a pleasure to make! Jess Frost will be releasing the Misdirection pattern in March 2016, but I'm offering a PDF giveaway of the pattern now (to be sent when the pattern is officially released)!


Details:
  • Leave one comment here about your current favorite color combination for a quilt. It could be anywhere from two colors and up!
  • Leave a second comment if you follow my blog or Instagram (@quiltyhabit), and tell me how you follow.
  • Open to anyone in the whole wide world.
  • Open until Friday 6/26 at 7 pm EST.
  • Winner will be chosen by the Random Number Generator and emailed on Friday night.

Thanks and good luck!


Thursday, June 18, 2015

Sunset: A Finished Quilt


When I saw my friend Jess Frost's "Misdirection" quilt for the first time, I immediately thought: "I HAVE TO MAKE THAT QUILT." I received the chance soon after when she asked for pattern testers. And guess what? The pattern is now available here on Payhip!


I was especially drawn in by the negative space available for quilting (as my readers know, quilting on my home machine is my favorite part of the whole process). I'm sure the quilt would look beautiful with any quilting; it's just one of those striking designs.
 

I chose red, orange, and purple to pop against the low volume background (hence the name "Sunset" - the purple is supposed to be the mountains, and the red and orange are the sun setting). It took a bit of color play to figure out what order I wanted, but it was worth it.


I quilted each section in a different motif, too: orange squares, red pebbles, and long purple swirls.


The quilt was a bit laborious in terms of cutting and making half-rectangle triangles, but I enjoyed the process. If you've never made HRTs before, never fear. They are similar to half square triangles except for paying attention to the way you sew them. Jess's diagrams and instructions explain it well. One you have the process down, you can easily chain piece them (I completed many of the piecing steps in groups).


I decided to sew up one of my signature pieced backings with reds and oranges from my stash (and you thought I would use up purples intentionally? :D ).

Photo Outtakes:


Day 1: I tried to hold the quilt up myself, but it was 
a. too windy that day and 
b. too wide.


Day 2: Mom snuck a picture from the deck of my sister helping and Mike taking the picture. Yes, we're cracking up about something. LOVE IT.


This is my favorite one - peeking out! And mom's on the right and my dad's head is coming up over that yellow pot. Gotta love family photos.


This quilt is waiting to be gifted. I hope it brings happiness wherever it goes. Thanks, Jess, for a chance to test your gorgeous pattern!

Linking up to Sew Cute Tuesday, Fabric Tuesday 
Needle and Thread Thursday
 TGIFF 
Crazy Mom Quilts 
 

Wednesday, June 17, 2015

WIP Wednesday

Well, school ended today! I'm out on the teaching job market, but in the meantime, I'm checking into some nice relaxation. Relaxation time = lots of sewing. And sew I shall (and read, and walk, and clean, and organize... there's such a thing as "summer cleaning" for school employees, right? Spring is too busy. :P).


I'm working on two double-sided fall/winter tablerunners, a commission for my friend, Julie. She plans to give them as holiday gifts later this year. I'll see her next week so I should have them done! Remember, you can request one of these if you donate in the "quilty" category for my husband's new business, RimeCore :) (though it doesn't have to be seasonal - it's all up to you!). Also, I plan to take on more commissions towards the end of July, so keep your eye on the blog if you are interested.

I'm also packing up my three mini quilt swap packages (Cotton and Steel, Lizzy House, and Anna Maria Horner). This is really a process! - making extra (optional) gifts, taking pictures, sewing on labels, wrapping them all nice and pretty, writing out cards, and getting to the post office. I'll be sending them out this week or early next week. I am so excited to give them to their new owners, and to receive three in return (though that is an extra bonus! I just love making things for people). I already shared Teal Peek here, and the other blog posts are forthcoming.

Lots of quilts coming up on here! I feel like I've been finishing a lot. Time to start something new?

Linking up to WIP Wednesday.


Monday, June 15, 2015

Top 10 Tips: Using Your Fabric Stash

Having a fabric stash is a quilter's equivalent to owning a large share of stock or a secret candy drawer. Not everyone has a large stash, but no matter what, you've probably spent some time staring at and touching all of your beautiful fabrics. After all, what could be better?


This was most of my stash at one point in March 2014 - so neat and tidy! It's not like that at the moment. :)

However, most of us, for one reason or another, have bought fabric, only to become uninspired by it and let it sit. And sit. Or, perhaps you've been accumulating more fabric than you know what to do with. Maybe you bought fabric for a specific project and you have extra afterwards. This topic is for you!

Top 10 Tips for Using Up Your Fabric Stash

1. Make pieced backings. This is my absolute favorite way to use up large scraps or pieces of fabric! I love to color coordinate my backings with my fronts. I typically pull two to three colors out and piece them together at random. It does take longer than, say, using one piece of fabric, but then you don't have to buy fabric for the backing. You're using what you have AND making a double-sided quilt!


 On the back of Pebble Cascade, I drew blues and greens from the front, and pieced some little triangles for interest.


The back of my Supernova quilt was pieced in panels. Can you see where? This is the easiest way to piece together a back, in my experience.


Simple and shows off the large prints: I used 3 cuts of Anna Maria Horner fabrics to back Soar.


Finally, I used some of my favorite pieces of fabric ever on the back of my Sister's Ten quilt. I use the back sometimes as the front because I love it so much!

2. Give it away or donate. This is a fun one - check your local 4-H club, Girl Scout/Cub Scout troops, or high school sewing classes. Your local quilt shop (LQS) might collect fabric to be used for charity quilts (see below). Our guild has a Freebie Table at every meeting, where members bring in sewing items in good condition; these items get donated after a couple of months if they aren't taken at meetings. It's very popular. Really, there are so many options out there for you!

3. Sell it. Between Etsy, eBay, Instagram, garage sales, and your own local quilt guild, there are many different venues to sell your fabric. You might want to consider packaging/pricing your fabric by the yard, half yard, or fat quarter, along with weighed or measured scrap bundles.

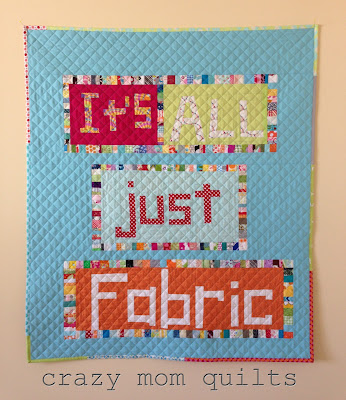
http://crazymomquilts.blogspot.com/2013/04/its-all-just-fabric.html

This quilt was made by Amanda Jean Nyberg. It's inspiring to me!

4. Teach someone how to quilt or sew. This is probably the most exciting one! If you teach them, make them a care package (or randomly drop off fabric from your stash that you think they might love). Let them choose fabric from your stash (I can understand how that one can be tough to do, but they're using it! It's just fabric. Right?). You'll have a blast together, you'll be teaching someone a new skill, AND you'll be using your fabric. That's a win-win!

5. Make charity quilts. Get together with your local guild, fabric shop, or group of quilters and make some charity quilts. They can be as simple as 2 fabrics back and front, and they can be perfect for the occasion. Try pairing hard-to-match fabrics (like some baby or novelty prints) with solids to make them really sing.


CJMQG 2014 charity sewing day - quilts made from fabrics donated by guild members
6. Start a challenge. Either online or in person, gather your quilty friends and challenge yourselves to make something from a large cut of fabric you've had sitting in your closet. I'd like to do this towards the end of the year when all my mini quilt swaps are done. :)

7. Surprise someone. Make pouches, tote bags, drawstring bags, pillow covers, coasters, or tablerunners for friends. These can be quick and easy projects, especially if you use one or two fabrics only!

8. Make your holiday gifts. Granted, this one requires some decent time, money (for materials), and planning, but it can be worth it! I've used up many pieces of fabric that I didn't know what to do with when sewing for loved ones. There are also some easy sewing gifts that can use up lots of fabric -  Sew Mama Sew's annual Handmade Holidays series has tons of ideas and links to tutorials.


 Fabric I didn't know what to do with = perfect wine tote Christmas gift. The inside is most of a fat quarter, too!

9. Premake bindings. Solids and small prints work perfectly! This is also a good step to take if you have a pile of quilt tops waiting to be quilted. If you make the binding in advance, then you have to finish it, right?

 
 Binding for Sedona. YUM, scrappy binding.


Binding for Breeze.  I love taking pictures of rolls of binding - not so much the binding making!

10. Swap it.* Get together with your quilty friends and swap fabrics you no longer want for something that you covet. If your stashes are mostly modern fabric, you could make that a stipulation. Or, swap solids. Swap small prints or large prints. Swap a size (fat quarter, half yard, or yard). Blind swap or white elephant swap. This would be really fun to do at a quilt retreat or quilt guild meeting!

*This option obviously puts fabric back in your stash... but hopefully the new fabric inspires you to make something, right?!

 We did a white elephant mini quilt swap at Mid-Atlantic Mod 2015 - I used my fabric stash to make a mini, and I got one to hang up in return!

Do you have more ideas for using up your fabric? Sound off in the comments. Let's make this a resource for all quilters looking for a way to use their pretty fabrics.

See other Top 10 Tips:


LinkWithin

Related Posts Plugin for WordPress, Blogger...